
Now it is more accurate, more fast with small size of data. You can try it.
Category: Uncategorized
Gradient Edge by Whoitam Auto Path Clip
Whoitam Multimedia Class
Whoitam SMS Sender
Whoitam Auto Path Clip
Applying Whoitam Effect
Whoitam Effect(http://www.whoitam.com/) makes an amazing effect on video from local file. The effect is a mixture of cartoon, paint and oil painting. Effect can be applied on live preview or convert and save a video file with this effect. It is totally free ! It requires Microsoft Net Framework 4.5. Enjoy this.
Whoitam Bangla OCR
It is a Bangla OCR. It recognizes only Bangla characters from image and makes editable text in ANSI or Unicode output. Here train datas are provided only standard from of characters and distorted, small characters are not provided as train data. So, it works good with 300dpi(Scanner Setting) scanned image. Some new technologies are used in here. It is accurate near 95% in word level. It is written in pure Microsoft DOT NET C# 2012 and without any external dependencies. First select a text area as a polygon by “New Selection” button and clicking on image. Then click “Start OCR”. If you select output in Unicode, then you can perform spell check. Our words collection for spell check is small. So, spell check can’t perform good.
It requires Microsoft DOT NET Framework 4.5 or higher. Please install it from Microsoft installer. The download link is http://go.microsoft.com/fwlink/p/?LinkID=225702
*Note 1: Some antivirus can detect it as a virus. But it is not a virus. False positive detection occurs because, we have provided a protection cover to protect this from decompilling, crackers and this protection cover some real virus uses too. So, some antivirus detects it as a virus for only this protection cover. We have not supplied this software sample to the antivirus companies to avoid this false positive detection. Because, we always update and improve Whoitam Bangla OCR.
*Note 2: After installed start it by “Run as administrator”.
Whoitam Monitor Intensity
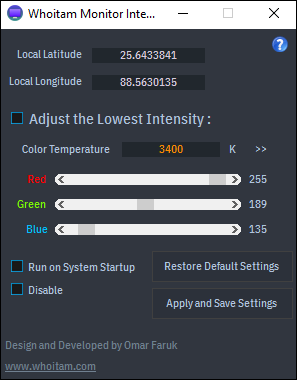
Whoitam Monitor Intensity changes Monitor light intensity for eye protection at night time. It adjusts the intensity smoothly according to its minimum value and the Sun position. The minimum value can be adjusted. It is totally free. Please give us feedback to set a good default minimum value of intensity. It requires Microsoft Net Framework 4.5.